
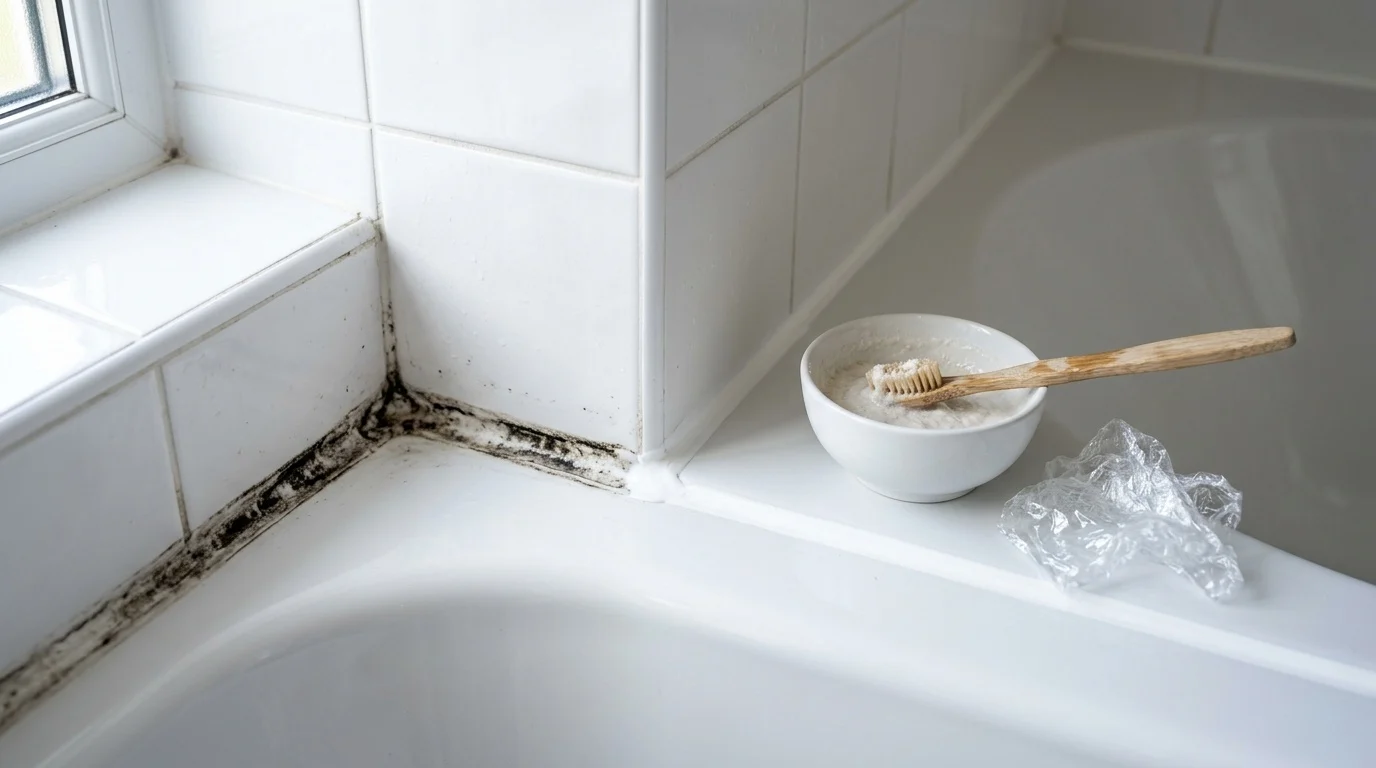

There is few things more relaxing at the end of a long, stressful day than stepping into a steaming hot shower to wash away the tension. Yet, that very act of comfort creates the ultimate breeding ground for one of the most stubborn and unwelcome household invaders: mold. Bathrooms are inherently high-moisture environments. Every time you shower, bathe, or even run the sink, microscopic water droplets settle onto walls, ceilings, grout lines, and vanity cabinets. When that humidity lingers without adequate ventilation, mold spores floating invisibly through the air find a hospitable home, germinate, and begin to colonize.
Among the various types of fungi that can take root in a damp home, Stachybotrys chartarum, commonly known as toxic black mold, strikes the most fear into homeowners. Its ominous reputation is well-deserved, as it can trigger severe respiratory issues, allergic reactions, and structural damage if left unchecked. However, panicking and ripping out your bathroom walls is rarely the right first move. Learning how to properly identify black mold, assessing the true scope of the infestation, and using correct remediation techniques will allow you to reclaim your bathroom safely and permanently.
Understanding Bathroom Mold and Why It Thrives
To effectively combat mold, you first need to understand what fuels it. Mold spores are an inescapable part of the natural environment; they drift indoors through open windows, cling to clothing, and hitch rides on pets. In the open air, these spores remain dormant and harmless. They only become a problem when they encounter three specific conditions: moisture, warmth, and an organic food source.
Your bathroom checks every single box on that list. Warm air holds significantly more moisture than cold air, and daily showers elevate relative humidity levels inside the room to astronomical heights. Once that moisture condenses on cold surfaces, mold spores land and feed. What do they eat? Surprisingly, mold is not particularly picky. In a bathroom, its primary food sources include soap scum, hair oils, dead skin cells, dust, and the paper backing found on standard drywall or gypsum board.
It is also worth noting a common misconception: not every dark patch of mold in a bathroom is toxic black mold. Bathrooms frequently host other common household molds, such as Aspergillus, Cladosporium, and Penicillium, which often appear in shades of green, brown, or pinkish-red. While these molds can also trigger allergies and asthma flare-ups, true black mold is distinguished by its dark, greenish-black coloration, slimy or velvety texture, and tendency to grow in areas subject to chronic water leaks or extreme condensation.
How to Accurately Identify Black Mold
Because visual identification alone can sometimes be misleading, you need to rely on a combination of physical characteristics, environmental context, and sensory clues. Stachybotrys chartarum typically presents as dark, greenish-black patches that look slimy when wet and dry, powdery texture when the surrounding air dries out. Unlike surface mildew, which wipes away easily with a damp cloth, black mold often has a deep-seated root system that penetrates porous building materials.
One of the most telling indicators of a hidden mold problem is not what you see, but what you smell. If your bathroom persistently smells like a damp basement, musty earth, or decaying leaves, even after you have thoroughly cleaned the space and scrubbed the tiles, you likely have a mold colony thriving out of sight.
Knowing where to look is half the battle. While black mold frequently grows openly on shower tile grout and silicone caulk lines, it loves to hide in dark, undisturbed spaces. Check carefully inside bathroom sink vanities where slow plumbing leaks go unnoticed, behind wallpaper, along ceiling corners where roof leaks or condensation pool, and underneath vinyl flooring or bath mats that trap moisture against the subfloor. If you notice warped baseboards, peeling paint, or bubbling wallpaper near your shower or tub, investigate immediately, as these visual distortions often signal moisture trapped deep within the wall cavity.
Evaluating the Severity: DIY Versus Professional Remediation
Before grabbing a spray bottle and a sponge, you must evaluate the scale of the mold infestation. Taking a DIY approach to a massive, structural mold problem can disperse millions of spores into your home’s air supply, making the issue significantly worse and posing serious health risks.
As a general rule of thumb established by environmental health guidelines, if the total area of mold growth is less than ten square feet—roughly the size of a standard two-by-five-foot patch—you can safely tackle the cleanup yourself using proper protective equipment. However, if the mold covers a larger surface area, if it originates from sewage backups or contaminated floodwater, or if it has penetrated deep inside HVAC ductwork or structural framing, you must call in a licensed, professional mold remediation specialist. Professionals utilize specialized containment barriers, industrial negative-air machines, and heavy-duty HEPA vacuums to capture spores before they spread to clean areas of your house.
Step-by-Step Guide to Safely Treating Minor Black Mold
If you have confirmed that your bathroom mold is localized and manageable as a DIY project, preparation and safety must come before cleaning. Never scrub mold dry, as this launches countless microscopic spores into the air for you to inhale.
Step One: Gear Up and Contain the Area
Protect your respiratory system and skin by wearing the right personal protective equipment. Put on an N95 respirator mask or higher, rubber cleaning gloves that cover your forearms, and protective eyewear to prevent accidental splashing of cleaning solutions or mold spores into your eyes. Close the bathroom door and seal the bottom crack with a damp towel to keep spores contained within the room. Open an exterior window if one is present, and place a box fan in the window blowing outward to exhaust contaminated air directly outside.
Step Two: Select the Right Cleaning Agent
Many homeowners instinctively reach for household bleach to kill mold. While bleach works effectively on non-porous surfaces like glazed ceramic tiles, it has severe limitations. Bleach consists mostly of water; when applied to porous materials like drywall or unsealed grout, the water sinks into the material while the active chemical stays on the surface. This leaves the deep-seated roots of the mold untouched, and the leftover moisture actually encourages the mold to grow back stronger.
Instead, opt for safer, more effective alternatives. Distilled white vinegar is a mild acid that penetrates porous materials and kills over eighty percent of mold species at their root. Alternatively, a mixture of hydrogen peroxide and water or a commercial-grade enzyme-based mold remover works exceptionally well without releasing harsh, toxic chemical fumes into your home.
Step Three: Scrubbing and Extraction
Spray your chosen cleaning solution generously onto the affected surface and let it dwell for ten to fifteen minutes. This gives the liquid time to break down the cellular structure of the mold.
Using a stiff-bristled brush or a scrubbing sponge, scrub the area firmly. Move in circular motions to lift the mold from textured grout lines or silicone seals. Once the mold is visibly gone, wipe the surface clean with a damp microfiber cloth, rinsing the cloth frequently in a separate bucket of clean water. If the mold has deeply embedded itself into silicone bathtub caulk, scrubbing will not suffice; you will need to cut away the old caulk entirely, sterilize the joint, and apply a fresh bead of antimicrobial silicone sealant.
Step Four: Disposing of Contaminated Materials and Drying
Dispose of your cleaning sponges, paper towels, and worn-out cleaning pads immediately by sealing them tightly in a plastic trash bag and throwing them in an outdoor bin. Wash your rubber gloves and laundering clothes separately in hot water. Finally, dry the cleaned area completely using clean towels and leave your exhaust fan running for at least an hour to drop the room humidity.
Fixing the Root Cause to Prevent Future Outbreaks
Eradicating existing black mold is a hollow victory if you do not fix the underlying environmental conditions that allowed it to grow in the first place. Mold will inevitably return within weeks if your bathroom remains a damp incubator.
Start by evaluating your ventilation habits. Many homeowners turn off their bathroom exhaust fan the exact moment they step out of the shower, which is a major mistake. An exhaust fan needs to run for at least twenty to thirty minutes after your shower finishes to completely evacuate the heavy moisture from the room. If your current fan is weak, noisy, or undersized, upgrade it to a higher cubic-feet-per-minute model equipped with a built-in humidity sensor that automatically operates until the air is dry.
Inspect all plumbing fixtures regularly for subtle, slow leaks under the sink basin or around the bathtub drain. Even a tiny drip that loses just a few tablespoons of water a day creates enough persistent ambient moisture to fuel a hidden mold colony behind your walls. Keep your shower walls and glass doors dry by keeping a squeegee inside the shower enclosure and making it a quick habit to wipe down wet surfaces after every use. By controlling indoor humidity and maintaining rigorous cleanliness, you will keep your bathroom fresh, safe, and entirely free of black mold.

Comments are closed.